|
|
| |
|
| ||||||||||||||||||
FirstClass 8 Unified Communications User Guide
for FirstClass TUI
Contents
Copyright 2001, 2004, 2007 by Open Text Corp. Open Text Corp.
905-762-6000 or 1-800-763-8272
Web: www.firstclass.com
Notices
You must accept the FirstClass License Agreement before you can use this product. If you do not accept the terms of the License Agreement, do not install the software and return the entire package within 30 days to the place from which you obtained it for a full refund. No refunds will be given for returned products that have missing components.
Information in this document is subject to change without notice. Certain features and products described in this document may not be currently available in all geographic regions. Distribution or reproduction of this document in whole or in part must be in accordance with the terms of the License Agreement.
All rights reserved. FirstClass, Open Text and other trademarks and the associated logos used herein are trademarks of Open Text Corporation and/or its subsidiary used under license. All other trademarks are property of their respective owners.
This edition applies to Version 8.3 of FirstClass and to all subsequent releases and modifications until otherwise indicated in new editions. This document is bound by international copyright law and the FirstClass Software License Agreement and Limited Warranty included with every FirstClass product.
About FirstClass Unified Communications
The FirstClass telephone user interface (TUI) expands the FirstClass Unified Communications functionality into a fully unified collaborative environment.
Previous FirstClass Unified Communications releases integrated all FirstClass modules giving you one unified Mailbox for all messages, be they voice, fax, or text.
A true Unified Communications system has the following functionality as a minimum:
• voice, fax, and email communications unified in a single message store
• communications collected from multiple telephone numbers or email boxes
• communications accessible from many devices such as telephones, fax machines, web browsers, PDAs, and desktop computers
• device access to communications that is consistent, feature rich, and maintains status changes (for example Unread status).
FirstClass Unified Communications enables you to access your phone and fax messages along with your email messages from your FirstClass client or from a web browser, just as you have always accessed your email. Phone messages are stored on the FirstClass server in standard .wav format, which is playable on virtually any platform.
FirstClass Unified Communications also enables you to access your email messages along with your phone messages from any phone, just as you have always accessed your voice mail. Using text-to-speech technology, text messages are actually read to you over the phone, just like you have always listened to your voice mail.
Using a fax machine to access your FirstClass Mailbox, you can retrieve your new fax messages.
You can also unify all your existing voice mailboxes so all of your voice messages will go to your FirstClass Mailbox, regardless of which of your phones was called.
FirstClass Unified Communications helps you work more efficiently and easily. Your location or technology will no longer determine what types of messages you can access. All your messages are stored on one central Mailbox that can be accessed using any web browser, any phone, or a FirstClass client. Never again will you have to log into your email, check your office phone voicemail, your cell phone voicemail, and your home phone answering machine to find that one important message. Simply log in from wherever you are, using whatever device is handiest and retrieve and manage all your messages.
In FC 8.0, with the introduction of the FirstClass TUI, users can now also access key FirstClass content by telephone. This includes:
• calendar tasks and events
• contacts
• memos
Additionally, sites with existing voice messaging systems who prefer not to integrate voice mail with their FirstClass system, can still use FirstClass Voice Services to give users phone access to their FirstClass Desktop using the FirstClass TUI.
How Voice Services works
Voice Services is the FirstClass module that links your phone to your FirstClass server. There are two aspects of Voice Services:
• call answering sessions
• login sessions.
A call answering session occurs when someone calls your number and leaves a message for you, or uses your preferences to be transferred to another number or Mailbox.
A login session occurs when you log into FirstClass for message retrieval or management.
Call answering sessions
When someone calls your FirstClass Unified Communications number and you do not answer (you are away from your desk or on the phone), they are transferred Voice Services. Your preferences and greetings are accessed and, based on these, the call in routed in the appropriate way. Some of these options include automatically transferring the caller to another number, playing a specific customized greeting for the caller, or playing a generic greeting for the caller and allowing the caller to leave a message.
Once the message is recorded it is placed in the user's Mailbox for retrieval.
Login sessions
There are two ways to log into your FirstClass Desktop using a phone:
• press 95 after leaving a message for someone on your FirstClass system
• call the FirstClass Unified Communications login phone number your administrator gave you from any phone.
For either of these login methods, you will need your Mailbox number (this is any valid FirstClass Unified Communications number for your Mailbox) and your voice password.
Once you have logged into your Desktop, you can:
• access your Mailbox to listen to, create, and manage messages
• listen to details of calendar events and tasks
• access your memos
• access your contacts.
• If you log in using a traditional fax machine you can print out your faxes to that fax machine.
Customizing your account
There are several ways you can customized your account to reflect your communications needs and how you work. Customizing options are:
• configuring multiple phones to leave messages in your FirstClass Unified Communications account
• setting your voice messaging preferences (options specific to call answering sessions and logon sessions)
• recording customized voice greetings.
Forwarding your phone
If you are in an office environment, your administrator can tell you how to forward your office phone to start receiving voice messages in your FirstClass Unified Communications Mailbox.
If you need to forward your cell phone, your home phone, or another phone to your FirstClass Unified Communications Mailbox, there are some things you need to know and some steps you will need to follow.
Your phone(s) must be configured to forward automatically to FirstClass Unified Communications when you do not answer. Each of your phone service providers will have a preferred method of implementing these features. There may be an extra charge for these services. Before starting the steps to forward your phone(s), read the Terminology section below.
Terminology you need to understand
CFNA/CFB - Call forward no answer/call forward busy. Having this service set on your phone line will ensure unanswered calls will be forwarded to FirstClass.
Call forwarding - If CFNA/CFB are not available for your phone, you can forward all calls using call forwarding. When call forwarding is set, calls will forward automatically to FirstClass without first ringing on the phone.
Cellular/Wireless - A phone system which operates without wires. Any cellular or mobile phone.
Landline/Wireline - A phone line that is carried over land by telephone wire. This is your traditional home phone line.
PBX - Private Branch Exchange. This is an on-site phone switch, usually in an office.
Configuring your phone
To set up your phone to work with FirstClass Unified Communications:
1 Give your administrator all the details of the phone you want to configure.
Your administrator will add this phone number to your personal list of FirstClass Unified Communications numbers. This is how Voice Services knows this number belongs to your account.
Your administrator may have special instructions for your particular type of phone, or may advise that the phone is not an ideal candidate for FirstClass Unified Communications, since some phone service providers do not pass the correct or complete call information when transferring or forwarding a call.
You cannot have the same phone number configured as another user on your system. For example, you and your spouse work together and you each have a FirstClass Unified Communications account. Your office number is your FirstClass Unified Communications number, which was set up by the administrator. Your spouse's office number is set up for his account. If you want your home phone number to forward to your FirstClass Unified Communications Mailbox, you can arrange this. However, this means all calls to your home phone number will come to your Mailbox. Your spouse cannot arrange to have the same home phone number forward to his Mailbox. Just like a traditional answering machine, you can only have one device configured to answer the phone.
2 Contact your local phone service provider or cell phone service provider.
Ask the customer service representative to implement CFNA and CFB for your line. They will require the number you want your calls to be forwarded to.
There may be an extra monthly charge for this service.
Many cell phones can be configured by you. Your cell phone product documentation or customer service representative will have the details.
Once these steps have been completed, you can receive messages from all callers to this phone number in your FirstClass Mailbox.
Some phone service providers do not forward complete or correct call information when CFNA/CFB are configured. This may result in restriction of some features (custom calling/called number greetings, call sender, reply, etc.)
Setting your voice messaging preferences
Set your voice messaging preferences to specify how your voice messaging works best for you. Through custom greetings, some of these preferences can be overridden for specific callers, specific called numbers, or at set times during the day.
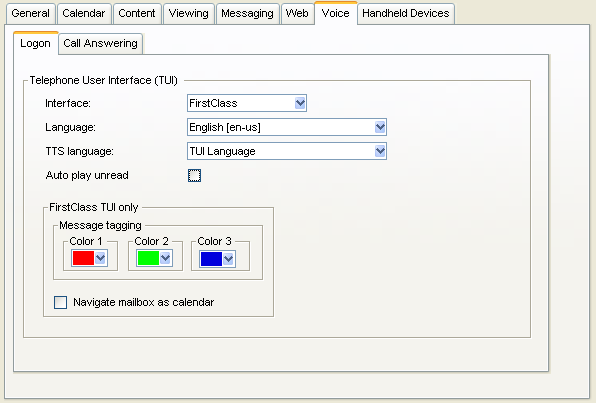
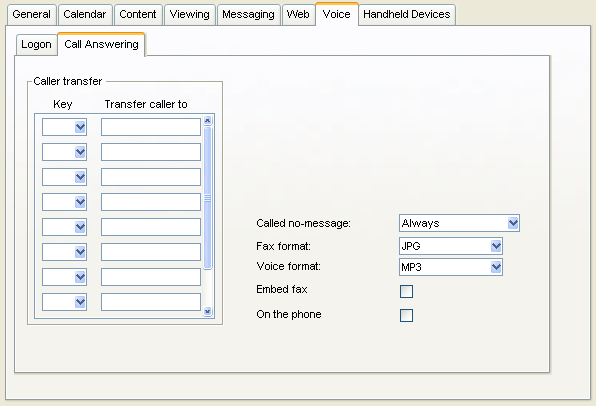
On your client, set your voice messaging preferences on the FirstClass Preferences form. Choose Edit > Preferences, then go to the Messaging - Voice tab.
The Voice Preferences client form help explains all the fields on this form.
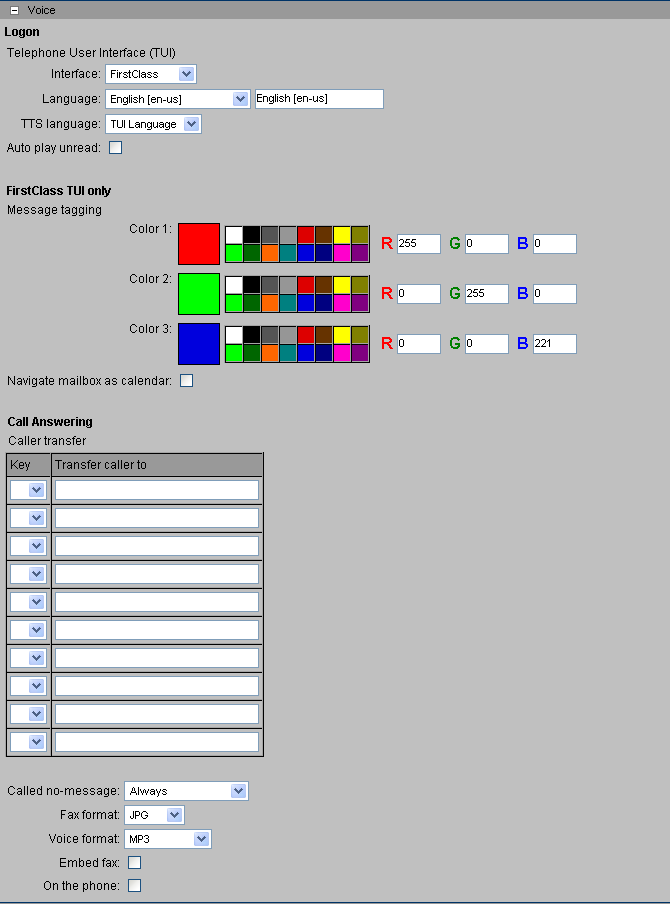
To access your voice messaging preferences using a web browser:
1 Click Preferences.
2 Scroll down to the Voice section.
The Voice Preferences web form help explains all the fields on this form.
Creating and customizing voice greetings
With FirstClass Unified Communications, you can create as many custom greetings as you like. Create personal greetings for specific callers, and/or chosen called numbers. You can also schedule greetings to play at specific times of the day and/or on specific days of the week.
Types of voice greetings
There are five main types of greetings:
Spoken name You should record a spoken name. It is used for system identification. Your spoken name will also play if you have no other voice greetings recorded or activated, or if no other greetings apply to the caller.
External greeting External greetings will play for callers outside of your organization.
Internal greeting Internal greetings will play for callers within your organization calling your internal extension number from their internal extensions.
Unknown caller Unknown caller greetings will play for callers whose number is blocked or unknown. This may include some cellular phones.
Voice menu Voice menus will be discussed in the Voice menus section.
You can record as many greetings as you like, but we recommend, as a minimum, that you record your spoken name and at least one external greeting.
The order your voice greetings will play
When you receive a call the system will look for and play your greetings based on the following criteria:
1 If the caller number is unknown, the system will look for an unknown caller greeting.
2 For all external calls, the system will look for an external greeting.
3 For all internal calls, the system will look for an internal greeting. If there is no internal greeting, the system will look for an external greeting to play.
Both external and internal greetings will be searched for in the following order:
1 Override greetings in the same order as below.
2 Enabled calling or called number greeting. You can have greetings which play for specific called numbers (which must be configured as valid numbers for your Mailbox), or for people calling from specific numbers.
3 Enabled scheduled greeting. Scheduled greetings will play at scheduled times, overriding all non-scheduled greetings with the same level of customization.
Scheduled greetings will override one another in the following ways:
• Scheduled greetings for calling or called numbers will be checked for first.
• If you have a greeting scheduled within another scheduled greeting, the one whose start time is nearest the current time will play. For example, you have a greeting scheduled to play for all callers between 9 AM and 5 PM Monday to Friday. You have another greeting scheduled to play for all callers between noon and 1 PM Monday to Friday. Callers will hear the noontime greeting if calling between noon and 1PM.
• If you have two greetings (both for the same calling/called number(s)) scheduled to start at the same time, but end at different times, the first one you created (the oldest) will play.
• If there is a schedule conflict (two greetings for the same calling/called number(s) and identical schedules), the first one you created (the oldest) will play.
4 Enabled non-customized greeting. This is a standard enabled greeting with no custom settings. Your external greeting will play for internal callers if you have not recorded an internal greeting.
5 System greeting with enabled spoken name. If you record no other greetings, your spoken name and the default system greeting will play.
6 System greeting. If you have recorded no greetings and no spoken name, the default system greeting will play. Your name will play by text-to-speech in the system greeting.
Recording your spoken name
1 Log into FirstClass Unified Communications using a phone.
2 Press 96 to access your spoken name.
3 Press 5 to record, say your name, and press # to end recording.
4 optional commands
Press 2 to review the recording.
Press 5 to rerecord your spoken name.
Press 76 to delete your spoken name.
Press 3 to enable or disable your spoken name.
5 Press # to return to your Desktop.
6 Press 93 to log out and hang up.
Recording and customizing greetings
You can record greetings using:
• your phone
• your FirstClass client
• a web browser.
We strongly recommend you record your greetings using a phone, since this will assure you a telephony quality recording.
Recording greetings using a phone
1 Log into FirstClass Unified Communications using your phone.
2 Press 7 to access your greetings.
3 Press 1 for your external greetings, or 2 for your internal greetings (the greeting type can also be changed when you customize the greeting).
4 if you have no greetings recorded, or want to record over your existing greeting
Press 5 to begin recording, record your greeting, and press # to end recording.
or
if you already have a greeting recorded and want to record additional greetings
Press 75 to create a new greeting, press 5 to begin recording, record your greeting, and press # to end recording.
5 optional commands
Press 5 to rerecord the greeting.
Press 2 to review the recording.
Press 76 to delete the greeting.
Press 3 to enable or disable the greeting (it is disabled when it is first recorded).
6 Press # to exit the greeting.
7 Create as many greetings as you want.
8 Press # to return to your Desktop.
9 Press 93 to log out and hang up.
10 Log into FirstClass using the FirstClass client or a web browser.
11 Open the Voice Greetings folder, which resides on your Desktop (never delete this folder).
12 Open the greeting you want to customize.
All greetings are created with the name "Voice Greeting" and the voice recording attached. You will change the greeting name on the Voice Greetings form.
13 Using the client form help, or the web form help, set your customizing options.
After customizing your greetings, all greetings in your Voice Greetings folder will have an LED light, which will be green when the greeting is enabled and currently scheduled, amber for override greetings, and black when the greeting is either disabled, or not scheduled to play at the current date and time.
Recording greetings using your FirstClass client
To record a new greeting using your FirstClass client do the following:
The sound quality may not be as high as a recording done by phone.
1 Open your Voice Greetings folder.
2 Click the new greeting icon to create a new greeting:
3 Record your greeting:
1 Click record on the recorder panel:
2 Record your greeting using your computer’s microphone.
3 Click record again to stop recording.
4 Using the client Voice Greeting form help, set your customizing options.
After customizing your greetings, all greetings in your Voice Greetings folder will have an LED light, which will be green when the greeting is enabled and currently scheduled, amber for override greetings, and black when the greeting is either disabled, or not scheduled to play at the current date and time.
Recording greetings using a web browser
If want to create a new greeting, but you have only web access (no phone and no client available) you can record a voice attachment on a Windows machine with a microphone and then attach this voice file to a greeting and customize it as you like.
Remember that the sound quality may not be as high as a recording done by phone.
There is no Mac OS equivalent to Sound recorder. You can only create .wav files using a Windows machine.
There are two steps to creating a voice file:
1 Configure Sound Recorder on your Windows operating system.
The first time you configure Sound Recorder on your computer, you need to do a complete configuration. All subsequent times you want to record a voice attachment, you can access your saved Sound Recorder configuration.
Step 1: Configuring Sound Recorder
Initial configuration
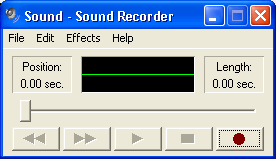
1 Start Sound Recorder on your computer by choosing Run from your computer’s Start menu and typing sndrec32.
Sound Recorder looks like this:
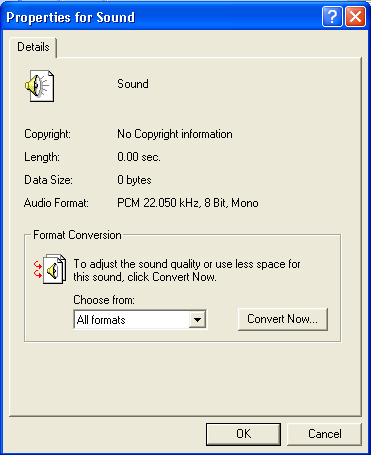
2 Choose File > Properties to open the Properties for Sound dialog box.
3 At Format Conversion, choose Recording formats and click Convert Now.
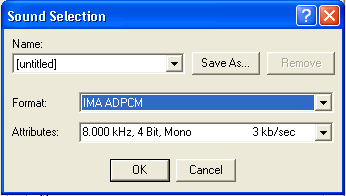
4 Choose IMA ADPCM at Format.
5 Choose 8.000 kHz 4 Bit Mono 3kb/sec (4kb/sec will work if you do not have the 3kb/sec option) at Attributes.
6 Click OK.
7 Click Save As and save the format as something identifiable like FirstClass.
8 Exit all dialogs to the Sound Recorder.
9 Go to Step 2: Record your voice file.
Accessing your saved configuration
The next time you want to record greetings or messages, follow these steps:
1 Start Sound Recorder.
2 Choose File > Properties.
3 Choose Recording formats at Format Conversion, and click Convert Now.
4 Choose FirstClass from the dropdown list at Name in the Sound Selection dialog box,.
5 Click OK to close the Sound Selection dialog box.
6 Click OK to close the Properties for Sound dialog box.
Step 2: Record your voice file
1 Press Record on the recorder to start recording.
2 Record your message.
3 Press Stop to end recording.
4 Choose File > Save as and name the file appropriately for the greeting.
5 optional
If you want to record several recordings, choose File > New to begin each new recording.
6 Using the web Voice Greeting form help, set your customizing options.
After customizing your greetings, all greetings in your Voice Greetings folder will have an LED light, which will be green when the greeting is enabled and currently scheduled, amber for override greetings, and black when the greeting is either disabled, or not scheduled to play at the current date and time.
Using FirstClass Unified Communications with a phone
The following section explains how to use FirstClass Unified Communications by phone access. By phone, you have access to your Mailbox, calendar, Contacts folder, and memos.
You can listen to voice and text messages from any phone and retrieve faxes through a fax machine. Create, send, reply to and forward voice and text messages to FirstClass Unified Communications users, and send messages to other email systems. Calendar and Contacts entries are read-only, but memos can be listened to and new memos created.
Logging in
1 Dial into the FirstClass Unified Communications system (your administrator will give you the number).
2 When prompted, enter your Mailbox number, followed by #.
3 When prompted, enter your password, followed by #.
If your Administrator set up your account without a password, press #. For security, set a password the first time you log in.
Desktop navigation
1 Open Mailbox
2 Open Contacts
6 Open Calendar
7 Open Voice Greetings folder
8 Open Memos folder
* Play the Help prompt
97 Change password
96 Record spoken name
95 Login to another account
93 Logout
# Cancel command/return to Desktop/stop recording
Mailbox navigation
# Stop/cancel
* Help
2 Play message/greeting
1 Skip backwards within the message
3 Skip forwards within the message
4 Go to previous message/greeting
5 Record
6 Go to next message/greeting
9 Call sender
0 Transfer to attendant/system revert number
71 Reply to sender
72 Play message envelope
73 Forward message
74 Reply to all recipients
75 Compose new message/greeting
76 Delete message/greeting
77 Play message history
78 Turn unread flag on/off
79 Send/unsend
70 Message delivery options:
1 Urgent delivery
2 Standard delivery
4 Private delivery
5 Acknowledge receipt
85 Toggle between voice and text messages
861Go to specific message number
865 Search for a specific message
88 Turn on/off Mailbox calendar view
If the messages you are playing are in a thread, only the messages in that thread will be read.
Listening to and managing messages
You can access all voice and text messages (including faxes) by phone. The only attachments that can be downloaded are fax messages (see Retrieving fax messages using Faxback). Download all other attachments using the FirstClass client or a web browser.
The following commands are available:
2 Play/Pause message
72 Play message envelope
The message envelope includes who the message is from, the delivery time, the subject (if available), the list of recipients, and the priority.
77 Play message history
Message history includes when and by whom the message was created, when it was sent, who has read the message, and who has replied to or forwarded it. This only applies to other FirstClass Unified Communications users.
76 Delete/undelete message
You can undelete a message you deleted during the current session only. Once you have logged out, the message will no longer be accessible by phone.
If you have accidentally deleted a message and logged out, log into your Mailbox using the FirstClass client or a web browser and undelete the message before trash collection occurs.
78 Toggle unread flag on/off
You can tag a message as unread so it will have a flag the next time you login.
71 Reply to sender
Reply only to the person who sent the message.
If the original message was a voice message, you can only reply to a FirstClass Unified Communications user who called from an identified FirstClass Unified Communications number.
If the original message was a text message, the reply will be sent as a voice attachment to the email address.
If you wish to attach the original, forward the message instead.
74 Reply all
Reply to all recipients of the original message. See Reply to sender above.
9 Call sender
This applies if the sender has a valid phone number or is a FirstClass Unified Communications user.
73 Forward message
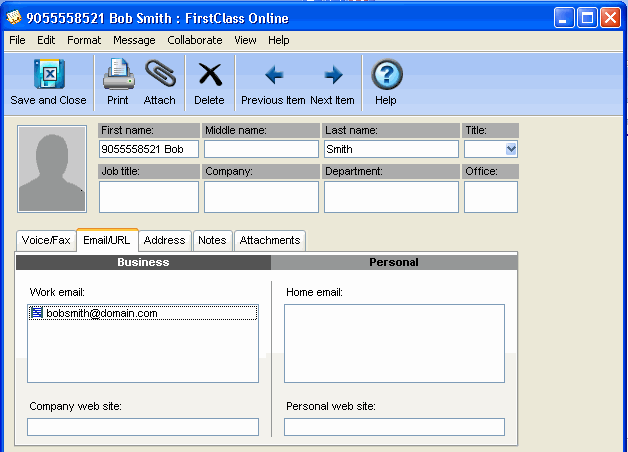
You can forward a message to another FirstClass Unified Communications user or anyone you have set up in your contacts folder with a phone number (no spaces or dashes) as the name and a valid email address:
Once you have addressed the list of recipients, you will be prompted to record a message. You can send the message without recording comments.
85 Switch between voice and text message playback
When accessing FirstClass Unified Communications by phone, your new voice messages will play first, followed by new text messages. Use this feature to toggel between text and voice message playback. Once one set of new messages (voice or text) has played to completion, the system will automatically move to the other message type.
861 Go to specific message
Use this command to jump to the start or end (or any other specific point) of your Mailbox. If you want to go to the last new message in your Mailbox, enter a high number like 99 (or 999 if you have a lot of messages).
865 Search for message
Use this command to search for a message in your Mailbox. Your search string may be part of a message sender, message subject, message category, or message keywords. You cannot perform an alpha-numeric search.
For an alphabetic search string:
For a numeric search string:
1 Press 0.
2 Enter the digits you want to search for.
For example, "1000" would be entered as "0 1 0 0 0".
3 Press # to start searching.
88 Turn on/off Mailbox calendar view
Use this command toggle your Mailbox "view". Calendar view sorts all messages (voice, fax, and text) by date, making it easier to find specific messages.
86 Enter Mailbox calendar navigation menu
Creating and sending messages
You can create and send a message by phone to another FirstClass Unified Communications user, or any person you have entered as a numeric name with a corresponding email address in your contacts folder.
1 Log into your account.
2 Press 1 foryour Mailbox.
3 Press 75 to create a new message.
4 Address the list of recipients, separated by # (any FirstClass Unified Communications user or anyone you have set up with a numeric Quick name in your contacts folder). Press # again to end the list.
5 Press 5 to record the message, followed by # to end recording.
6 optional commands
5 rerecord the message
2 listen to the message
76 delete the message
70 set delivery options:
1 Urgent delivery
2 Standard delivery
4 Private delivery
5 Acknowledge receipt
7 Press 79 to send the message.
8 optional
Press 79 to unsend the message.
Retrieving fax messages using Faxback
To retrieve faxes, you have to access the system from a fax machine that has a telephone handset. You will be advised of the number of pages the fax contains and then you will be prompted to choose to receive the fax immediately or at the end of the messaging session.
1 Log into your Mailbox using a fax machine handset.
2 Press 2 to listen to the message.
3 To receive the fax immediately (ending your login session)
Press 1
Press Start on the fax machine.
Replace the handset.
or
To tag the message for end of session delivery
Press 3.
Listen to all of your messages and tag any other faxes.
Press # to return to your Desktop.
Press 93 to log off.
Press Start on the fax machine.
Replace the handset.
4 The fax will print out on the fax machine and the system will disconnect when the fax has finished printing.
Contacts folder navigation
When you open your contacts folder, you will be prompted to enter a name look up. Spell the name, last name then first name, and press #. If you have few contacts, spell a portion of the name and press #. There may be more than one match.
If you want to scroll through your contacts from the beginning of your contacts list, press # instead of entering a name.
To navigate through your contacts list:
Press 6 to go to the next entry.
Press 4 to go to the previous entry.
When the correct entry is listed:
Press to do this
2 listen to the contact information and any notes on the contact form
9 call the user
A list of contact numbers is presented. Choose the desired number by following the prompts.
6 play next entry
4 play previous entry
5 enter another name
At any time:
Press to do this
0 system revert or initiate thru-dialing
# return to your Desktop
* help
Calendar navigation
When you open your calendar, you will hear the name and time of the current event (if it is still ongoing), or the next event.
You will hear a summary of the number of tasks and events for this day. If there are no events for this day, you will be told there are no events.
Tasks play after events.
Commands for calendar navigation:
During the current day's events or tasks:
Press to do this
2 play event or task details
4 go to the previous event or task on this day
6 go to the next event or task on this day
To navigate to other days in your calendar:
Press to do this
83 go to the next unread event.
86 go to the next event (after the current day).
84 go to the most recent event (before the current day).
87 go to the previous day.
89 go to the next day.
88 go to a specific date:
Enter the date as:
0# for today
dd# for the current month and year
ddmm# for the current year
ddmmyy# (or ddmmyyyy#) for a date in a different year.
At any time:
Press to do this
0 system revert or initiate thru-dialing
# cancel command or return to your Desktop
* help
Memos folder navigation
When you open your memos folder, you will be told the number of memos in the folder.
Navigate through the list to hear the Name and Subject of each memo:
Press to do this
6 go to next entry
4 go to previous entry
2 play memo
76 delete memo
Creating new memos
You can create a new voice memo while in the memos folder:
Press to do this
75 compose new memo
5 record/re-record
# stop recording
At any time:
Press to do this
0 system revert or initiate thru-dialing
# cancel command or return to your Desktop
* help
Placing outbound calls while logged into FirstClass by phone
When logged into your FirstClass account by phone, or you have left a message for another user, you can directly place an outbound call without hanging up and redialing.
1 Log into your account using a phone, or leave a message for a user.
2 Press 0 followed by the number you are calling (if you do not begin dialing the number within one and a half seconds of dialing 0, you will be transferred to the system revert number (this is usually reception)).
The number must be preceeded with the outside line access number used on your phone switch (if applicable) and the long distance code (if applicable).
Your ability to use this feature is restricted to the outdialing restrictions your administrator has set up.
Express Delivery
Use Express Delivery to leave a message for an individual, a conference, or a personal mailing list, without calling recipients directly or logging into your Mailbox.
1 Dial the Express Delivery number (your administrator can give you the number).
2 Enter the recipient’s Mailbox number, or the recipient’s numeric address as saved in your contacts folder.
3 Record your message.
4 Press # to end recording.
5 optional commands:
Press 2 to review the message.
Press 5 to re-record the message.
Press 76 to delete the message.
Press 70 to for delivery options.
6 Press 93 to log out.
Working with messages using a FirstClass client
You can retrieve any voice, text, or fax message received by FirstClass Unified Communications from your FirstClass client. For general information about working with messages, see FirstClass Quick Reference.
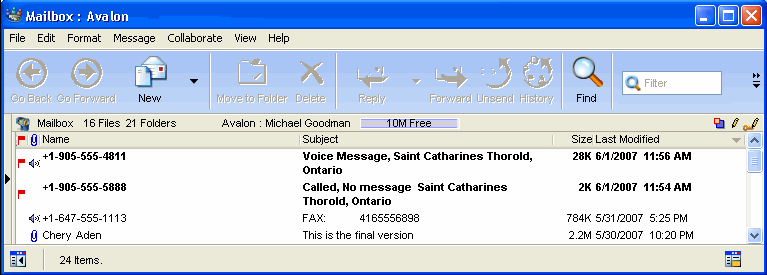
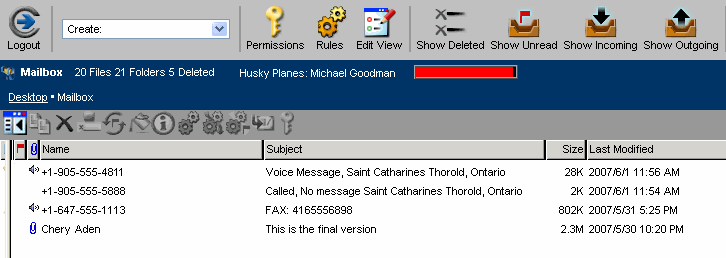
A Mailbox with a Called, No message notification, a fax message, and a voice message looks like this:
Voice messages
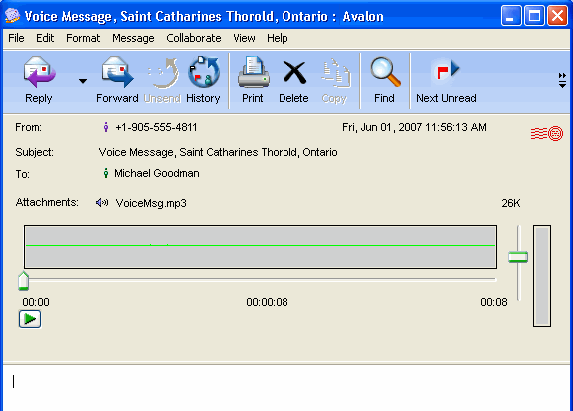
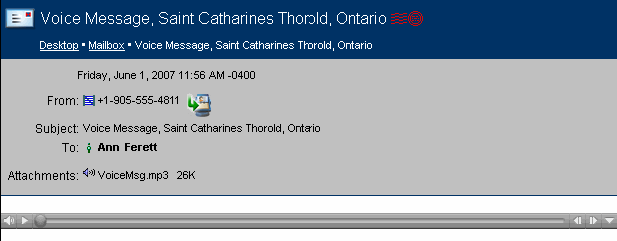
To open a voice message, double-click it. The message will look like this:
A voice message is received as a FirstClass message with a .wav file attachment. The first time you open the message, the attachment will play automatically.
To play, stop, or resume playback, click the Start/Stop button.
Go to a specific part of the message by dragging the pointer, then click the Start/Stop button to listen from that point forward.
To adjust the playback volume for the current message only, use the volume control to the right of the recorder panel. To adjust the playback volume for all messages, adjust the volume on your computer.
Replying to voice messages
You can reply by voice, if you have a microphone hooked up to your computer, or in writing to any voice message from a FirstClass Unified Communications user who called from an identified FirstClass Unified Communications number.
To reply by voice:
1 Choose Edit > Reply and then choose Edit > Insert > Insert Voice.
2 Record your message at the recorder panel by clicking the Record button to start and stop the recording.
3 Send the message.
To reply in writing:
1 Click Reply.
2 Type your reply in the message body.
3 Send the message.
If you wish to include the original message with the reply, forward the message instead of replying.
Forwarding voice messages
You can forward a voice message to any valid email address.
1 Click Forward
2 Type your comments in the message body (if desired).
3 Send the message.
The recipient can listen to the message on any computer equipped for sound.
Fax messages
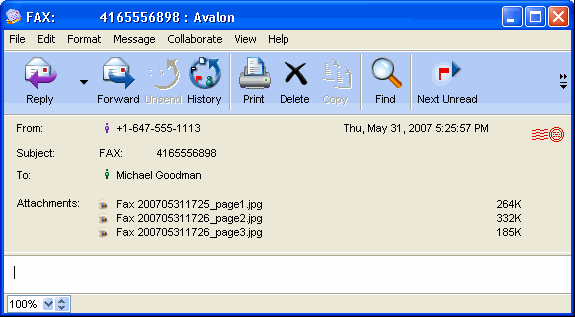
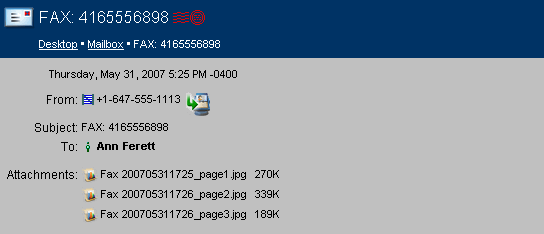
To open a fax message, double-click it. A fax message will look something like this, depending on how you choose to receive faxes:
If you have set your preferences to receive each page as a separate attachment (PCX), there will be one attachment per page. These attachments open in a FirstClass viewer window.
If you have set your preferences to receive all pages as one attachment (DCX), there will be one attachment. These attachments must be downloaded before they can be viewed. You can view the fax with most imaging programs.
To view a fax page double-click the attachment.
To save a fax page, right-click the attachment and choose Save Attachment.
Called, No message
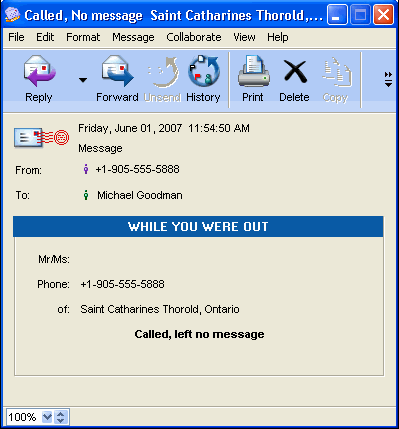
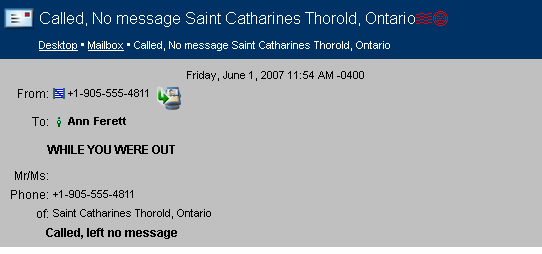
If someone phones but doesn’t leave a message, you may see a Called, No message notification (depending on how you set up your voice messaging preferences). The notification looks like this:
Call user feature
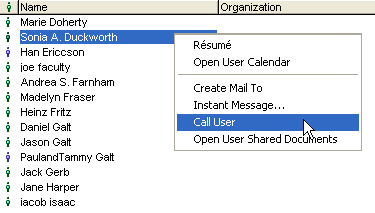
The call user feature allows you to initiate a call to another user without having to manually dial their phone number. This can be done from any form in the client that uses presence management, that is, anywhere a user's name is listed by the server (for example, the Directory, Who's Online, or in a message envelope). This can also be done for personal contacts in your Contacts folder.
Calling a user using presence management
1 Right-click (Windows) or control-click (Mac OS) a user's name.
2 Choose Call User.
3 Your phone will ring.
To use this feature you must be at your primary DN.
4 When you answer, the user's primary DN will begin to ring.
The primary DN is the number listed first in the "Voice DN" field on the User Information form.
Calling a contact from the Contacts folder
You can call any contact in your Contacts folder, provided there is a phone number on the contact form.
1 Open the contact form for the contact you want to call.
2 Position the cursor over the field label for the phone number you want to call (i.e. Home phone 1, Work phone 1, etc.).
3 Right-click (Windows) or Control-click (Mac OS).
4 Follow steps 2 to 4 above.
Working with messages using a web browser
You can retrieve any voice, text, or fax message received by FirstClass Unified Communications from a web browser. For general information about working with messages, see FirstClass Quick Reference.
A Mailbox with a Called, No message notification, a fax message, and a voice message looks like this:
Voice messages
To open a voice message, click it. The message will look like this:
To play the message, click the attachment. Your playback options will depend on the current software configuration of your computer.
To save the voice attachment, right-click the attachment and choose Save Link As (Netscape) or Save Target As (Internet Explorer).
Replying to voice messages
You can reply by voice, if you have a microphone hooked up to your computer, or textually to any voice message from a FirstClass Unified Communications user who called from an identified FirstClass Unified Communications number.
To reply by voice using a web browser (Windows only):
1 Click the reply icon.
2 Create a voice file by following the instructions in Creating voice attachments for web browsers
3 Upload the voice file to the message as you would upload any type of attachment.
4 Send the message.
To reply in writing:
1 Click Reply.
2 Type your reply in the message body.
3 Send the message.
If you wish to include the original message with the reply, forward the message instead of replying.
Forwarding voice messages
You can forward a voice message to any valid email address.
1 Click Forward
2 Type your comments in the message body (if desired).
3 Send the message.
The recipient can listen to the message on any computer equipped for sound.
Fax messages
To open a fax message, click it. A fax message will look like this:
To view a fax page click the magnifying glass to the right of the attachment.
To download the fax to save it, click the download icon to the left of the attachment.
Called, No message
If someone phones but doesn’t leave a message, you may see a Called, No message notification (depending on how you set up your voice messaging preferences). The notification looks like this:
Voice menus
A voice menu is an automated attendant that can be used to manage incoming calls. Since voice menus are a type of greeting, you can use regular greeting options to create a menu that plays for a specific called or caller number, or a menu that plays at scheduled times. This results in a flexible, effective automated voice attendant system. Every FirstClass Unified Communications user has access to the voice menu option, but due to the complexity of this feature, it is recommended that voice menus be created and/or controlled by an administrator or subadministrator.
Planning your voice menu
Before starting to build a new voice menu, we recommend you read the entire voice menus section so you are familiar with all the steps involved and the options available. The following suggestions will help you build a well-planned voice menu:
• Use a flowchart or table to plan your voice menu.
• Leave room to enter voice menu names and prompt names.
• Write a detailed script before beginning.
Planning the voice menu before recording it will result in a more professional, user friendly voice menu system.
Writing your script
When planning your voice menu, there are a few rules of thumb:
• Determine who your primary callers are and tailor the menu to those callers.
• Make the menu simple to follow and easy to use.
• Try to keep the menu short by offering four or fewer call handling options.
• Consider using a submenu for detailed call handling.
• Keep the options in logical numeric sequence.
Once you have determined how you want to handle incoming calls with your voice menu, you can start to write your script.
Introductory greeting
Begin with an introductory greeting. Husky Planes’ introductory greeting for all after hours callers will be called "After hours welcome". This name is entered in the "Introduction" field on the General tab of the Voice Menu form.
Callers will hear:
Thank you for calling Husky Planes. The office is now closed. Our regular hours are Monday to Friday 8 AM to 6 PM. If you know the extension of the person you would like to reach, please enter it at any time.
This greeting will play only once when the call is answered.
Menu script
At Husky Planes we know most of our callers are customers, visitors, and staff calling in to access their FirstClass accounts. We will build the script with them in mind.
Callers will hear:
If you know the name, but not the extension of the person you would like to reach, press 1.
To reach the Customer Service department, press 4.
For our mailing address and directions to our office, press 5.
To leave a message in the general Mailbox, press 6.
To log into your FirstClass account, press 7.
To transfer to reception, press 0.
If you require further assistance, press *.
When callers press 5, they hear the following submenu, which we will call "Directions":
For our mailing address, press 1.
If you are calling from a fax machine and would like a map with directions to the office, press 2.
If you would like verbal directions to the office, press 3.
To return to the main menu, press #.
We did not enter options for keys 2 and 3. All internal extension numbers at Husky Planes begin with these numbers. We are reserving these for direct extension dialing, which we will cover when discussing the Dial Direct option.
Throughout this section we will be referring to this script and programming this voice menu.
Building your voice menu
Now that we know how we want to serve our customers with our voice menu and we have a written script, we can begin building the voice menu.
We are building our voice menu using the FirstClass client. Voice menus can be modified using a web browser, but the original voice menu form can be opened from the client only.
Before beginning, ensure that the "Login limit per user" on the Usage Limits tab of the System Profile is set to "No limit" since voice menus use multiple logins.
Creating a voice menu
1 Open the Voice Greetings folder for the user whose valid FirstClass Unified Communications number will be the incoming number for the voice menu.
2 Create and open a new folder called "Voice Menus" inside the Voice Greetings folder.
This folder must always be called "Voice Menus". If there is no Voice Menus folder in the Voice Greetings folder, your voice menu will not work.
3 Create and open a new folder inside the Voice Menus folder.
Give this folder a unique name that identifies the voice menu.
If you have several voice menus, they must each have a separate uniquely named folder inside the Voice Menus folder.
4 Choose Message > New Document Special > Voice Menu to create a new voice menu in this folder.
5 Complete the Voice Menu form.
You must fill in all fields on the General tab and all fields on each of the appropriate numbered tabs.
6 Create voice prompts in their associated documents.
Documents containing your prompts or associated documents must be created to match the information entered on the tabs. Voice Services will look for these documents when playing your voice menu options, as well as once a caller presses a key. The following documents must be created if you entered a document name in the corresponding field.
From the General tab:
• Introduction (we called ours After hours welcome)
• Invalid key prompt (we called ours invalid)
If you do not record a prompt, the default system prompt will be used informing callers that the command is not recognized.
• Transfer prompt (we called ours rotary dial help)
If you prefer not to enable this feature, do not record a prompt. No help message will play before the last cycle of the voice menu.
From the following fields on each numbered tab:
• Voice prompt
• Any additional voice files required for specific actions.
To create voice prompts, follow these steps:
1 Open a new document by choosing File > New > New document inside the folder containing this voice menu (the folder created in step 4).
2 Drag the split bar down to reveal the document information fields. Enter the following information:
Name
Give this document the same name as you did in the appropriate field on the General tab (Introduction field) or numbered tab (Voice prompt field).
Subject
This field can be left blank, or you can enter comments to help you identify where the prompt contained in this document fits into your voice menu.
3 Type the prompt script in the document body.
For example, the script for your Introduction could be similar to,
"Thank you for calling Husky Planes. The office is now closed. Our regular hours are Monday to Friday 8 AM to 6 PM."
If you do not record the prompt but it is typed in the document body, the prompt will play by text-to-speech.
4 Record the prompt:
• Choose Edit > Insert > Insert Voice.
• Click Record to start recording.
• Record the prompt as written in the document body.
• Click Record again to stop recording.
5 Play the recording to check the quality.
Ensure that there is no silence recorded at the beginning or end of the .wav file. Silences will cause your voice menu to be choppy, with lengthy pauses within and between the prompts. If the prompts have been recorded too loudly, the playback will be distorted.
6 Close the document.
Ensure it is in the folder for the correct voice menu. If you are recording prompts for a submenu, ensure the document is in the submenu folder.
7 Repeat this process for each prompt.
7 Upload faxes if required.
If you have used the Receive Fax action on a numbered tab, the name of the document containing the fax or announcement must be entered in the "Document name" field of that tab.
Follow these steps to create the document:
1 Open a new document by choosing File > New > New document inside the folder containing this voice menu (the folder created in step 4).
2 Drag the split bar down to reveal the document information fields and enter the following information:
Name
Give this document the name you entered in the "Document name" field.
Subject
You can leave this field blank, you can enter comments to help you identify where this document fits into the voice menu, or you can add comments about the contents.
Anything written in the document body will be sent as a cover page.
3 Choose File > Attach file to upload the fax file or document.
4 Close the document.
5 Ensure it is in the folder for the correct voice menu .
8 Create a new greeting for your voice menu and activate your voice menu.
Do not do this for submenus.
Once the Voice Menu form has been completed and all the prompts have been recorded and attached to documents residing inside your voice menu folder (inside the Voice Menus folder), you can activate your voice menu. To do this, create a new voice greeting using the standard Voice Greeting form.
Complete the form as follows:
You can choose options on the General tab and the Scheduling tab, but the Call Handling and Faxes tabs are not applicable to voice menus. The Addressing Options field on the General tab is not applicable to voice menus.
Enter the following on the General tab:
Name
Enter the name of the voice menu. This must be the name of the folder you created inside the Voice Menus folder in step 4. This is also the "Name" from the General tab of the Voice Menu form.
Greeting Type
Choose Voice Menu.
Status
Choose Enabled.
9 Test the menu.
Test all options in your voice menu to ensure the correct prompts play for the correct options and that all transfer numbers are correct.
Creating a submenu
1 Choose Go to Submenu as the action on the numbered tab.
2 Enter the name of the submenu in the "Menu name" field.
3 Enter a document name in the "Voice prompt" field.
4 Create and open a new folder within the current voice menu folder, with the name of the submenu that you entered in the "Menu name" field.
We will call our submenu Directions and create this folder inside the After hours folder.
5 Go to step 4 of Building a voice menu and complete steps 4 to 7.
Do not create a new greeting for a submenu.
6 Test the submenu.
Your completed voice menu
Once you have completely set up your voice menu and it is activated and working, you should keep a record of all settings for future reference. You may find it helpful to create a chart something like the following:
Submenu:
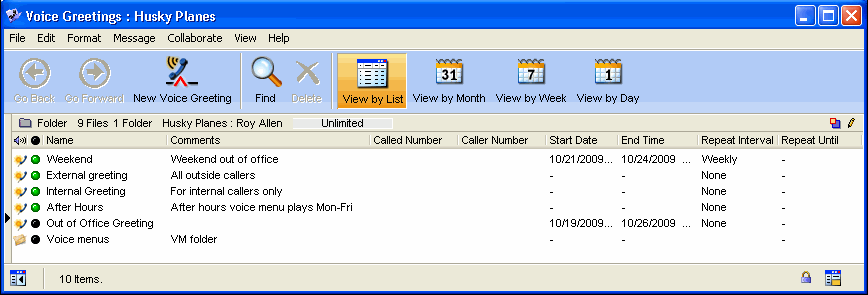
When the voice menu is complete, the Voice Greetings folder will look like this (there may be additional greetings):
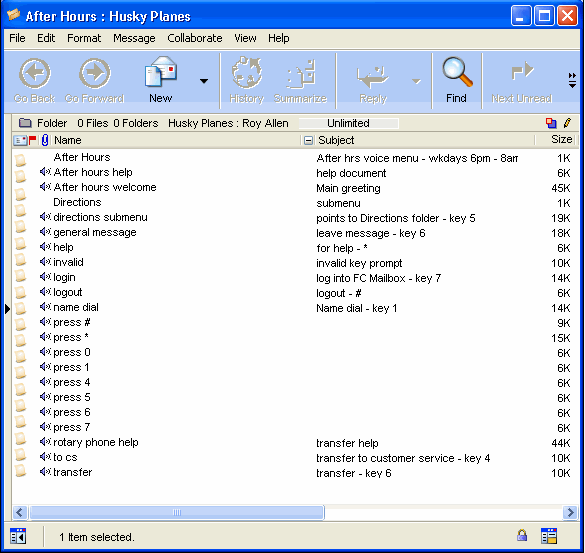
The After Hours folder (inside the Voice Menus folder) will look like this:
The Directions folder is the submenu created for tab 5. All the documents related to this voice menu will be inside this folder.
Scenarios of FirstClass Unified Communications at work
FirstClass Unified Communications can truly change the way you work and how you think about communications. FirstClass Unified Communications users are never cut off from their important data, as long as they have access to a telephone or a computer. Let's take a look at some uses of FirstClass Unified Communications that help to demonstrate the power of the product. All of these scenarios can be created by any FirstClass Unified Communications user, by following the instructions detailed throughout this document:
• Steve is a busy executive and FirstClass Unified Communications user. Every morning during his commute to the office, he puts his cellphone on handsfree and logs into his FirstClass account. Not only does he get all of his voice mail, but he has all of his email read to him using text-to-speech (TTS). By the time he arrives at the office, he has an overview of what he has to do that day.
• Julie is a sales representative who is on the move all day. Since she is hard to reach, she has her voice greetings configured to allow callers who reach her work number to either leave a message or get connected to her cell phone number. Whenever she is waiting in an airport lounge, she logs into her FirstClass account using a web kiosk, and is able to read her email, listen to her voicemail, and view her faxes.
• Len has four telephone numbers: his business line, his business fax, his cell phone, and his home phone. He has all of these forwarded to FirstClass Unified Communications, with a separate greeting for each. His fax number just beeps and receives the fax, while his business phone has a sophisticated voice menu allowing callers to do one of the following: leave a message, call his cell phone, or talk to his secretary. The cell phone greeting simply prompts the caller to leave a message, while the home greeting has his best Clint Eastwood imitation and a "secret" option for his friends to reach his cell phone.
• Joe is a financial advisor who spends a lot of his day on the phone and prides himself on personal service. In addition to the kinds of greetings mentioned in the previous example, which help Joe's customers reach him, Joe uses custom greetings to let specific customers know what's happening with their accounts. When Joe's biggest client calls, she gets the message, "Hi Cheryl, Joe here. I recorded this message at 9:00 AM on December 8th and it looks like a good day to buy the stock we discussed. Let me know in your message if you want me to make a buy, and I'll call you back ASAP". Because Cheryl is so important, Joe records a message for her each day, and any message she leaves is marked urgent so Joe gets paged as soon as she hangs up.
• Elena is a lawyer working in a small firm. For each client the firm represents, they create a conference to track communications with or about that client. If anyone at the firm gets an email, fax, or phone message regarding Tridem Labs, for example, they simply drag it into the "Tridem" conference. When the Tridem Labs VP, Elena, calls to complain about the way they handled a contract negotiation, Elena is able to find the Tridem Labs CEO's voice mail that instructed them, and forward it to Elena via Internet email.
• Bill is a lawyer at Elena's firm who specializes in recording transcripts. The firm has set up a "Transcripts" conference with its own phone number. Now, instead of taking a recorder and bringing tapes into the office, Bill calls the "Transcripts" number with his handsfree cell phone, and starts recording. When he's done he hangs up, the message arrives in the conference immediately, and the transcription clerks start working right away transcribing the text directly into the body of the message. The message is then sent into the appropriate client conference for later use, where both the original recording and the text transcript can be accessed.
• Rose is an elementary school teacher in a school where FirstClass UC is installed. Even though the school has only a couple of telephones, each teacher has a personal phone number. Parents can call and leave messages for Rose without disturbing the class or the secretaries. By using the powerful greetings system, Rose has set up a voice menu that allows parents to hear about homework assignments and school news. Rose listens to her voice mail from her classroom computer and uses FirstClass documents (and TTS technology) to keep the homework section of her voice menu up-to-date. For her, the best feature is that she can type in the day's homework just once, and use FirstClass Unified Communications to publish it to both her class web page and the voice menu system.
• Graham is a high school phys. ed. teacher. He is scheduled to coach his team in an important soccer tournament. He knows he won't have time to go to the school to check the location of the first game. While stuck in a traffic jam, he logs into his Desktop by phone, checks his calendar for the game schedule, and then checks his contacts for the assistant coach's cell phone number. He calls and reassures her that he will be there as soon as possible — all without ever having to hang up or fumble with a pen and paper.
• After a successful meeting with the board superintendent, Annette, a school principal is heading back to her school, bursting with ideas. Since she has a staff meeting booked as soon as she returns, she won't have time to sit down and write out her ideas while they're fresh. Before leaving the parking lot, she logs in using her phone, creates a new memo, and records her thoughts.
• As a dedicated special needs teacher, Sharon has set up her preferences so she will be paged when she receives an urgent voice or text message. Her pager goes off. She logs in by phone to listen to the message, but the return number the parent left isn't being answered. She looks up the family in her contacts and gets all their phone numbers so she can reply to the parent's urgent email in person.
• In the school parking lot, Joe, a vice-principal runs into the board superintendent who he's been trying to make an appointment with. She wants to confirm an appointment time, but Joe doesn't have access to his schedule. He thinks he might have a meeting the day she has suggested, but he has to book the appointment if at all possible. He logs in by phone, accesses his calendar, enters the date, and listens to details of that day. In less than a minute he knows if he is available and can confirm immediately.
| |||||||||||||||||||||||||||||||||||||||||||||||||||||||||||||||||||||||||||||||||||||||||||||||||||||||||||||||||||||||||||||||||||||||||||||||||||||||||||

