|
|
| |
|
| ||||||||||||||||||
|
About FirstClass application development
An application is a collection of:
• custom forms, created using FirstClass Designer
• mail rules and application rules
• custom columns and view properties
• FirstClass scripting
The above elements can reside in a container or in a container template.
• User groups
Users are given access to an application through a conference or folder. Use model Desktops to give group members access to the application container.
How to begin building an application
The first step in creating an application is to figure out exactly what you want the application to do and how it will work. The planning and development of a FirstClass application requires a deep understanding of FirstClass features and philosophy.
Once you have planned your application and you know what all the required components are and how to implement them, you need to create a new application using FirstClass scripting. The INITIATEAPPINSTALL command registers FirstClass applications in the Application Configuration form and creates the application folder. If the application registration fails, the script terminates.
At startup, the console will list all Registered applications by name and registration number. The console will also display a message about the application when a new application is created or uninstalled.
FirstClass components used in application development
As mentioned above, an application is built using existing FirstClass features and components. This section gives a brief overview of how they are used in application developments with links to full feature documentation.
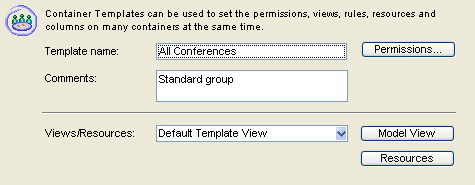
Container Templates
A Container Template controls member containers':
• permissions
• custom columns
• toolbars
• view properties (layout)
• explorer options
• resources
• rules
Related links
Custom columns
Custom columns allow the administrator or application developer to add new columns to the container, or to entirely replace the default columns. Columns can be propagated with a variety of information from text, images, or icons, to a checkbox field from a form. Users can be given the privilege of customizing their container view, or having it unalterable from what is set on the custom columns form.
Related links
Customized toolbars
Custom toolbars can be set at the container template level.
In addition, manual rules can be placed on the toolbar, making it easy for anyone with appropriate permissions to run the rule, without requiring permission to open the Rules folder in the container.
Related links
Alternate container views
Container templates allow you to specify the container layout to use based on the user's permissions.
Moderators can be given an entirely different conference view than users, including alternate column layout, toolbar objects, backgrounds, etc.
Example
The Class and all the subcontainers are in two groups.
Teachers are moderators, so they inherit the Moderator views. They see a custom column to approve conference items, they see all standard columns, they have manual rules on their toolbar, and their view is less cluttered with images.
Students are Contributors or less, so they inherit the Default view, which includes a simpler interface with fewer columns, and exciting background images.
Related links
Locking container views for users
8.0 AP introduced the following enhancements, available at the container template and individual container levels.
Once checked, these feature is always enabled. If a container is a member of a group where feature is enabled through a checkbox, then the feature is on, there's no way to switch is off. Another group may be required.
Related links
Using unapproved items
Unapproved items can be hidden from the list view of a conference, viewable only by the conference moderator.
To enable this feature, select "Hide unapproved items" on the conference permissions form.
Using custom columns and alternate views, the moderator can simply click a hidden "approval column" from the moderator's container list view to instantly approve the message. There is no need to open the properties form.
Related links
Creating containers that will not be listed in the Directory
Unpublished conferences do not appear in the Directory, even the administrator's Directory. For this reason, mail cannot be addressed to unpublished conferences, but mail to the conference may be created by clicking the New Message icon or selecting Message > New Message from within the conference. Because they are not in the Directory, there are no duplicate name conflicts associated with unpublished conferences.
Once enabled, any container that is made a member, will not appear in the Directory. This applies to newly created containers added to the container template only.
Related links
Rules & Resources
Rules and resources are available at the container template level, to be used by all member containers.
To open the Rules & Resources folder
1 Open the container template.
2 Click Resources.
The application rule
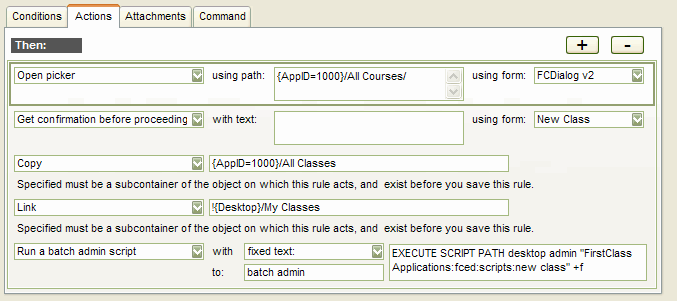
Application rules give access to an expanded set of triggers, conditions, paths, and actions.
Creating Application rules requires the Application Developer privilege, set on the Group Privileges or User Info form.
From the Rules folder, click the New Application Rule icon:
New triggers
New Paths
Path syntax for direct access to specific containers:
{Desktop} Current user's desktop
{Mailbox} Current user's mailbox
{Calendar} Current user's calendar
{Contacts} Current user's contacts folder
{Typed=##} Current user's typed folder, Contacts (7), My Documents (32) for example
{AppID=####} Root folder of application with ID ####
At the group level, the path entered must be relative to the application folder, or start with ! in order to evaluate the path when the rule is executed by the user.
Conditions of note
These actions can occur anywhere in the action list and there can be multiple occurrences of either. They can also occur in any order. This means that a rule can perform some actions, be interrupted, and then continue processing after the confirmation or picker window has been accepted. Closing the window stops rule execution.
Any fields collected by any of the actions will be retained and available to any subsequent actions. For example, if a field is entered on an earlier form by the user, and the same field ID appears on a later form, the user's input will be displayed in the later form.
Some rules actions affect the later processing of other actions. You should avoid splitting these sets of actions across an Open Picker or Get Confirmation action, since these currently reset the action processor. The best way to avoid problems is to perform the user interface actions first and finish with the actions which perform operations on the store.
Related links
Forms and special field IDs
Field Control
The Field control field tells FirstClass to perform a particular action on another field, depending on the value chosen in this field.
This field applies to checkboxes, numbers, radio groups, and static lists. The value the user chooses in one of these fields controls the value in, or state of, the controlled field. For example, the chosen value can:
• select (1) or clear (0) another radio button
• select (1) or clear (0) another checkbox, or set that checkbox to the third, unchanged, state (2)
• set the number in another field
• choose a list item in another field
• show (S) or hide (H) another field
• enable (E) or disable (D) another field
• protect (P) or unprotect (U) another field.
Field control doesn't take effect until users make choices. Therefore, you must make sure that fields appear the way you want them to when users first open the form.
Examples
Approve/Unapprove field (61)
If a form has a field 61, where the value can be set to either 0 or 1, the field can control the approve/unapprove state.
Editor Field (43)
A editable field with the ID of 43 will have a fully functioning editor field. Useful in tabbed form.
Field 30002 & Get confirmation forms.
The Get Confirmation rule, can also optionally specify some text, which appears as field 30002 on the form. This can be used for any purpose, for example to allow a single form to be re-used, by using field 30002 as the guide text.
Open Picker forms must be in the 7900 - 11000 range. The 30002 field can also be used on your picker forms.
Related links
FirstClass Scripting
Rules & Scripting
Rules support an action to run batch admin. If a rule is created with this action it will only compile if the current user is the administrator. Users will be able to run the script, most likely by choosing a manual rule, but they can only perform actions that they are allowed to do through the client.
The commands can be contained directory in a the rule action, or can use the EXECUTE command to access a script. The EXECUTE command provides more flexibility and expendability.
Session data
Running batch admin command from a rule action also gives you access to session data for field substitution.
7001 User's first name
7002 User's initials
7003 User's last name
7006 User's Client ID
7012 User ID
7100 User's full formatted name
7101 Date of copy
7102 Time of copy
7103 Selected item
5004 User's primary OU
Example
The ENABLEFIELDSUBSTITUTION FirstClass scripting command help includes a detailed example of how this feature can be used.
Related links
Adding the AppID to the application
An application must have an AppID.
When the INITIATEAPPINSTALL FirstClass scripting command is run, the application containers is automatically defined as an Application Container subtype (35).
To configure the AppID, you need to use the FirstClass scripting PUT command. The PUT command help includes an example that can be used to configure the AppID.
Add Person command
The client supports a new command "Add Person" which can be accessed using a toolbar button. This opens a Directory window from which you can select one or more names. When the users' names are selected, the server adds a subscription to the parent container. This way, users with the "Edit permissions" conference permission can add user subscriptions without being given permission to open, view, or edit the container permissions form.
The Add Person command will create a folder in the parent container called "Roster". The name of this folder can be changed at any time. A list of users who have access to the parent container is captured in the Members list.
To add the command to the toolbar:
1 Choose View > Toolbars > Customize Toolbars
2 Choose Collaborate at Category.
3 Drag the Add Person icon to the toolbar.
When using Add Person, if the container has the "Requires messages to be approved" permission enabled at the container or group level, the user is added unapproved.
Creating workflows
A workflow is a created as a FirstClass application. As such, it uses a combination of
• custom forms and use of the workflow step field, created using FirstClass Designer
• containers, which may be a member of a container template
• mail rules
• custom columns and layouts for moderators and non-moderators
Workflow can start by a user choosing Message > New Message Special or it can be initiated from a container, by opening a document or selecting New message.
The workflow step field
The workflow step field (8068) is a field which is used to effect changes to a form as it is stepped through a workflow. The field can be set to a start value (typically zero) and can be updated using the rules system, or by selected server operations.
The workflow copy & workflow send features increments the workflow step by 1.
The workflow copy and workflow send are accessed through command button field.
Workflow copy command 858
Workflow send command 832
The rules system can update the field in the object (permanent stepping), or it can send the field to the client (client masking). A combination of these facilities can be used to change the appearance of the form as it progresses through the workflow steps.
A workflow scenario
The following is a sketch of how workflow could be used for an IT work request.
1 A user opens the Employee Administrivia conference and initiates an IT Work Request. He opens a custom document and clicks a command button called IT Work Request, which was defined by the Application Developer as a Workflow Copy.
2 After filling in the necessary information the user sends the request to a conference by clicking on a command button called Send, which was defined by the Application Developer as a Workflow Send.
3 In the IT Work Request conferences, the Help Desk Manager reviews the request and assigns it to one of the Help Desk team members. The action of assigning the request to a team member, makes the request visible to all team members.
4 The team member updates the status. In this case, from Assigned to In Progress, to Complete. All help desk members can see the current status of all requests by opening the IT Work Request container.
5 When the request status is set to Complete the request is automatically filed in the Archived folder.
The IT Work Request Form
The IT Work Request form is created using the workflow field 8068 and 2 command buttons.
Workflow copy (858) increases 8068 by 1
Workflow send (832) increases 8068 by 1
The 8068 field uses field control to reveal hidden fields on the form.
The form also has a field with the value of 61 (approve/unapprove), this field controls whether the IT Work Request can be seen by the team members.
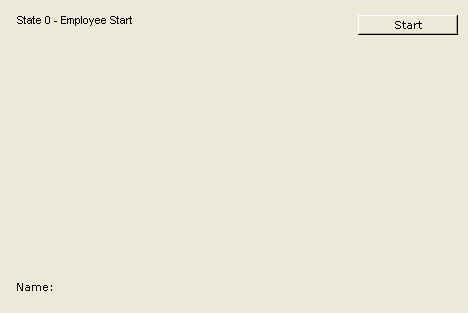
State 0 Employee Start
The form the user sees looks something like this:
The user clicks Start to initiate the workflow.
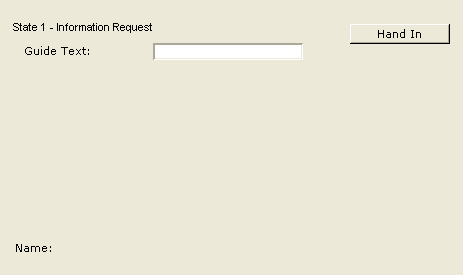
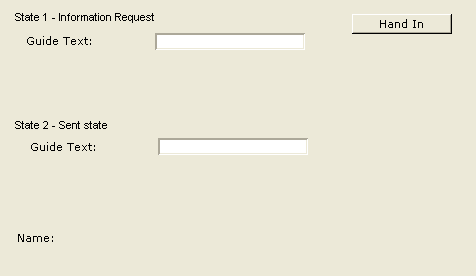
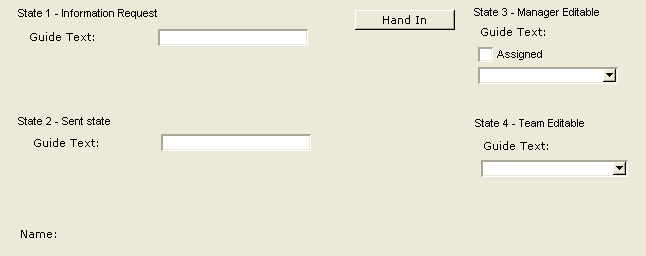
State 1 Employee enters the requested information and sends the request by clicking Hand In.
State 2 Sent request
States 3 and 4 Manager's and team's view of request
The IT Work Request conference
The permissions are as follows:
• Manager is moderator.
• IT Help Desk employees are contributor + edit items.
• Employees can send to the conference.
• Messages require approval and "Filter unapproved items" is enabled.
• New requests arrive unapproved, therefore team members cannot see requests until the manager assigns the request to a team member.
• The Assigned checkbox has a value of 61. When the manager enables the checkbox the request is approved and made available to the team members.
Rules for the container
Rule 1
On Receipt change the message to a document. This allows Help Desk employees to edit the messages.
Rule 2
The workflow field has a value of 2 and the user has his copy of the request in his Mailbox. We need to reveal fields that we don't want the user to see.
We can us a rule to increment the workflow field whenever the manager opens the request. At this stage only the manager can see the request.
The rule will be as follows: on message read, if the current user is the Help Desk Manager, temporarily set the field 8068 to 3, which reveals another set of hidden fields.
By sending the change just to the client, it reserves the workflow state of the request in the user's mailbox. The rule could set any field on the form and field control could reveal more hidden fields.
Rule 3
On modify, when the status field is set to Complete, move document to the Completed Requests subfolder.
Container Custom columns
Custom columns in the IT Work Request conference will be mapped to the fields on the custom form. Status field updates are visible from the table manager.
Field Control annotation for field 8068
//When field 8068 is set to 0 show field 1000; when it is set to 1, 2, 3 and 4 hide field 1000
0/1000:S;1/1000:H;2/1000:H;3/1000:H;4/1000:H;
//When field 8068 is set to 0 hide field 1001, for 1, 2, 3, and 4 show field 1001
0/1001:H;1/1001:S:2/1001:S;3/1001:S;4/1001:S;
//When field 8068 is set to 0 or 1, hide field 1002, for 2, 3, 4 show field 1002
0/1002:H;1/1002:H;2:/1002:S;3/1002:S;4/1002:S;
//When 8068 is set to 0, 1 or 2, hide field 1003, and for 3 and 4 show field 1003
0/1003:H;1/1003:H;2:/1003:H;3/1003:S;4/1003:S;
//When 8068 is set to 0, 1, or 2, hide filed 1004, and for 3 and 4 show filed 1004
0/1004:H;1/1004:H;2:/1004:H;3/1004:S;4/1004:S
| ||||||||||||||||||||||


